|
|
|
NOTE: This tutorial was written for MapGen ver 1.12 - newer versions (including the SDKi) operate differently. The code here, however, is still useful, and so I left it here for that purpose. Also Note that techniques here may be dated.
With the expert Delphi user in mind
| You can download the source here. |
By DragonPhinn [Howard N Smith]
If you are looking at the source code and want to skip immediatly to the explanation of a certain section, use the table of contents below. |
|
|---|---|
| TForm1.Exit1Click | TForm1.PaintBox1MouseDown |
| TForm1.Image2Click | TForm1.Image1Click |
| TForm1.VersionHistory1Click | TForm1.FullScreen1Click |
| TForm1.AboutMapEditorVer301Click | TForm1.TextEditor1Click |
| TForm1.FormCreate | TForm1.Button1Click |
| TForm1.NewMap1Click | TForm1.N1CodeGenandDataView1Click |
| TForm1.Button2Click | TForm1.SaveMap1Click |
| TForm1.SaveMapImage1Click | TForm1.LoadMap1Click |
Before I begin this tutorial, I want to thank the creator of "Ye Olde Delphi Game Programmer" Ben Watt, who developed the basic idea behind this tile engine. Without his tutorial none of this would be possible. Many thanks to him!
This tutorial was designed to help people understand how I went about coding MapGen, and how this code operates. I'm sure that by understanding how I made MapGen you can learn to implement various techniques in new ways to create engines and utilities of your own. Be warned that I designed this with users who are comfortable with Delphi 4.0, and those who are not familiar with most delphi terms and basic usage may not get much out of this tutorial. If you are looking for something geared more toward the newcomer, check out my basics tutorial.
Note: All programs were done in Delphi 4.0
Objective: Before we begin tearing into the program, lets first set out what the objectives are for this project; What MapGen was designed to accomplish. First, I wanted a graphical interface to visually create maps. I also wanted to be able to save these maps in a format that would be accessable to an engine, and allow the map to be checked and understood for collision detection. For additional functionality I wanted a built in Code Generator and a way to edit the maps textually. With that in mind lets check out the program.
Lets begin with the main form, since that is where all the "main" program is contained. The form itself is fairly basic. A TMainMenu, a TCoolBar with two TImages, a large TImage (which I called TPaintBox1 because it was originally a TPaintBox but I was forced to change it due to lack of saving capabilities). That is all for the components that you can see when running the program.
However, if you open up the MapGen source you will notice that there are more controls on the main form then you see when you run the program.
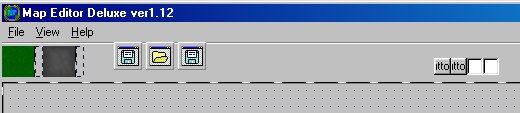
Two TSaveDialogs one TOpenDialog, two TMemo components, and two TButton components. There is also a TMainMenu component which is thrown off the screen on the form to the right somewhere. These items add functionality to the form. The save dialogs allow the user to save his/her progress either in *.map format or the image in *.bmp format. The open dialog allows the user to open *.map components. The other four components are set to visible := false so that they cannot be seen by the user. They are what I use to trick the Delphi compiler into allowing me to access variables that are local to only the form. That may sound confusing at first, but you'll get it before this tutorial is through.
Now Lets move on to the code for the Main form. The first set of information I entered was the var section. This is where I identify and initialize variables that can be accessed and used by the form and it's components. The variables I have are:
The selected variable I use to determine which was the last image that the user selected (which one to paint). The 20x20 array is the data container for the map. Hence the name.
The next section is a simple command for the 'Exit' button in the TMainMenu. It closes form1 when it is chosen.
This next section is a bit larger. Lets take a look at it:
procedure TForm1.PaintBox1MouseDown(Sender: TObject; Button: TMouseButton;
  Shift: TShiftState; X, Y: Integer);
var
xpos, ypos, dix,diy: Integer;
drawthis : TGraphic;
str: string;
begin
if selected = 100 then drawthis := image1.picture.graphic;
if selected = 101 then drawthis := image2.picture.graphic;
xpos := x div 32;
ypos := y div 32;
PaintBox1.Canvas.Draw(xpos*32,ypos*32,drawthis);
map[xpos,ypos] := selected;
memo1.clear;
str := '';
for diy := 0 to 19 do
begin
     for> dix := 0 to 19 do
     begin
     str := str+inttostr(map[dix,diy])+',';
     end;
memo1.lines.add(str);
str := '';
end;
end;
First lets figure out what this function is supposed to do. When I click on the map it is supposed to paint a square at that position, however it can't just paint it wherever the user clicks, or else the blocks won't line up. So first we must set up some sort of pseudo grid to work off of. Well we know that each of my tiles is 32x32 pixels, and that means that we can only paint on numbers divisible by 32. How do we do it? First we take where the player clicked, then we use the div command (which divides integers and returns an integer instead of a Real) and divide the location of the click by 32. By doing this we will convert the location of the click into the number of 32x32 blocks from (0,0): the upper left hand corner. When we call the command to paint on the screen, we multiply these values by 32. This will make the numbers divisble by 32 and thus keeping the blocks lined up, instead of overlapping.
Confused? Substitute in numbers and it will make more sense. EX: The user clicked on 133. Use the div 32 command and it will return 4. This means it is 4 32pixel squares from the left. When you call the paint command you multiply the four by 32. It paints it at 128, a number divisible by 32.
Keep in mind that I'm dividing by 32 because that is the size of my tiles.
I know I had trouble with it at first. This basic technique is also described by Ben Watt Check out Ye Olde Delphi Game Programmer and reference his tutorial for a different view on the paint procedure.
Now lets check out my code. First off, as always, is my var statement.
The dix, and diy integers are all for my For loops located within the program.
The xpos and ypos are used for storing the clicks made by the user, after being formatted.
The drawthis graphic is a storage area for the tile image I want to draw.
The string is what I am going to use to add the data to DataView and CodeGen.
Next in the code we find the following
if selected = 100 then drawthis := image1.picture.graphic;
if selected = 101 then drawthis := image2.picture.graphic;
These two if statements check to see which graphic is selected. If it was 100 then the graphic should be set equal to Image1, which contains the Grass image. If the number is 101, then it pertains to the stone image. If I added more tiles, then I would simply add another if statment.
Note: You may have noticed that I have not yet defined the initial value of selected however, the areas of code below this will do it for me. Remember, this variable is global and accessable by multiple functions and events
Note: Many are familiar with the TImageList component which would probably be a better idea. However, for purposes of the engine and this tutorial, I decided to use solitary images. It is usually my preference to use TImageList components.
This next part:
xpos := x div 32;
ypos := y div 32;
Takes where the user clicked (x,y) and uses the div command by 32 to get number of 32x32 squares the click was from the upper left hand corner (0,0).
The next statment:
Accesses PaintBox1's canvas property, and then draws the tile on the location clicked.
Next it stores the numerical representation of the tile in the map array. Like so: map[xpos,ypos] := selected;
The next section uses a memo box located on the form (Memo1) to store the array in a GUI format. It basically takes the array, puts it in a string (adding commas and other required formatting characters) and then puts the string in the memo box. This memo box will be used to transport the array across multiple forms, since arrays cannot be accessed by forms other than the one it was declared in.
memo1.clear;
str := '';
for diy := 0 to 19 do
begin
     for dix := 0 to 19 do
     begin
     str := str+inttostr(map[dix,diy])+','; //Add a comma after each entry
     end;
memo1.lines.add(str);
str := '';
end;
First, we clear the memo pad, to remove older work. Next, we initialize the value of str. We set it's contents to nil, although we do so with the empty quotes.
Note: It's very important that you don't make str := ' '. The space will reading the memo much more difficult. It is imperitive that you keep the quotes empty ''.
Next are the for statements. These two nested for loops goes through the entire map variable by going from 0,0 then 0,1 all the way to 19,19. Remember: in Delphi, numbers start with zero, not one. It copies each variable onto the memo, adding commas after each. The end result looks like the following:
100,100,100,100,100,100,100,100,100,100,100,100,100,100,100,100,100,100,100,100, 100,100,100,100,100,100,100,100,100,100,100,100,100,100,100,100,100,100,100,100, 100,100,100,100,100,100,100,100,100,100,100,100,100,100,100,100,100,100,100,100, 100,100,100,100,100,100,100,100,100,100,100,100,100,100,100,100,100,100,100,100, 100,100,100,100,100,100,100,100,100,100,100,100,100,100,100,100,100,100,100,100, 100,100,100,100,100,100,100,100,100,100,100,100,100,100,100,100,100,100,100,100, 100,100,100,100,100,100,100,100,100,100,100,100,100,100,100,100,100,100,100,100, 100,100,100,100,100,100,100,100,100,100,100,100,100,100,100,100,100,100,100,100, 100,100,100,100,100,100,100,100,100,100,100,100,100,100,100,100,100,100,100,100, 100,100,100,100,100,100,100,100,100,100,100,100,100,100,100,100,100,100,100,100, 100,100,100,100,100,100,100,100,100,100,100,100,100,100,100,100,100,100,100,100, 100,100,100,100,100,100,100,100,100,100,100,100,100,100,100,100,100,100,100,100, 100,100,100,100,100,100,100,100,100,100,100,100,100,100,100,100,100,100,100,100, 100,100,100,100,100,100,100,100,100,100,100,100,100,100,100,100,100,100,100,100, 100,100,100,100,100,100,100,100,100,100,100,100,100,100,100,100,100,100,100,100, 100,100,100,100,100,100,100,100,100,100,100,100,100,100,100,100,100,100,100,100, 100,100,100,100,100,100,100,100,100,100,100,100,100,100,100,100,100,100,100,100, 100,100,100,100,100,100,100,100,100,100,100,100,100,100,100,100,100,100,100,100, 100,100,100,100,100,100,100,100,100,100,100,100,100,100,100,100,100,100,100,100, 100,100,100,100,100,100,100,100,100,100,100,100,100,100,100,100,100,100,100,100,
Look familiar? It should. It is what you see in DataView.
Wait a minute I hear you saying, How did it get from Memo1 onto the DataView window?
I will get to that in a moment my friend. Be patient.
The next six procedures are simplistic. The first two define selected when the appropreate image is selected (grass=100, stone block=101). This is for drawing the map, as well as collision detection. The following four sections open or show a window for viewing.
Next is some pretty heavy coding.
procedure TForm1.FormCreate(Sender: TObject);
var
x,y:integer;
str : string;
begin
for x := 0 to 19 do
begin
     for y := 0 to 19 do
     begin
     map[x,y] := 100;
     end;
end;
memo1.clear;
str := '';
for y := 0 to 19 do
begin
     for x := 0 to 19 do
     begin
     str := str+inttostr(map[x,y])+',';
     end;
memo1.lines.add(str);
str := '';
end;
selected := 100;
end;
This procedure, being the Form1.Create method, is used to initialize all my global variables. The first for loop it calls is for the purpose of initializing the map array. It sets all positions to 100, which is the default tile (grass).
Next, the procedure iterates, or goes through, all positions in the map variable by using two nested for loops. The first for goes through all the "y"'s or vertical positions, and for each of those reads the 20 x's, or horizontal positions. For each of these positions, I add to a local variable str (short for string), and add the variable contained in the map array (using the inttostr or integer to string function), followed by a comma. Then I end the first for loop. In the y loop (because I only want this to occur every line), I add the string, (str) to memo1.lines and then reset str.
Finally, it sets the selected variable to 100, which, (once again), is the reference to the default tile.
Ok, next section is attached to the Button1.Click event. I use this to trick the engine into allowing me to access local variables (like the map array) from a non local area (like another form). Basically, to allow Form2 to view what is on the map array I simply have a memo component on form1 that always looks the same as the map array. This way, reading the values off memo1 is the same as reading from the map array. The Button1.Click is basically what redraws the map onto the screen.
Authors Note: Recently I discovered a more efficient way to perform this operation. If I place the variable "map" in the local declarations area of Form1, then Form2 can access it. At the time of production, however, I did not know this, so MapGen features a slower, bulkier, and cheaper way to perform a simple operation. I do not recommend using this method to access local variables, and as such I won't elaborate fully on how this worked.
Here is the code:
procedure TForm1.Button1Click(Sender: TObject);
var
x,y,z: integer;
land1,land2,drawthis: TGraphic;
begin
land1 := image1.Picture.Graphic;
land2 := image2.Picture.Graphic;
drawthis := image1.picture.graphic;
z := 0;
for y := 0 to 19 do
begin
     for x := 0 to 19 do
     begin
     Memo1.SelStart := z;
     Memo1.SelLength := 3;
     map[x,y] := strtoint(Memo1.SelText);
     z := z+4;
     end;
z := z+2;
end;
for y := 0 to 19 do
begin
     for x := 0 to 19 do
     begin
     if map[x,y] = 100 then drawthis := land1;
     if map[x,y] = 101 then drawthis := land2;
     PaintBox1.Canvas.Draw(x*32,y*32,drawthis);
     end;
end;
end;
This code is pretty yucky. It makes me want to write a tutorial to show how DCMG (Dungeon Crawl Map Generator) works to show some better routines and functions to make all this work properly, but to the task at hand.
First it initializes two variables called land1 and land2. Upon conception of this program, each tile that required painting would have to be added here. As you can see thier values are set to the images stored on the image1 and image2 components placed on the page. DrawThis, another variable, is also given a default value in case something goes wrong. Next, the value of z is set to 0 (also a precautionary technique.) And now you see, once the dual nested for loops. It is, as in the other cases, a means of accessing each value within the map array. Within the x loop, you notice something very different from the other for loops. I'm using z as a way to parse the map information.
So first and foremost we have to figure out how we are going to parse this information. Since it is stored in a very strict format (very intentionally by the way) we can easily parse this statment without actually reading the information.
Authors Note: This is VERY dangerous for a programmer to do. Since I made the read algorithm so strict, a simple space could corrupt an entire file. Recently, a generous submission from Neil shows us how to parse using a very useful function of his design. You can check this function out at the Code Snippet area.
To extract the information, we must first: read three characters, discard a comma, and then read the next three commas. At the end of a line, we must discard a comma and an end line character (which isn't visible but is still read as a character). So basically, after we read 3 characters, we then skip 1, until the end of the line where we skip 2. This is where the "z" variable comes in.
I use the Memo1.SelStart command to set the cursor at wherever "z" is, which at the beginning is 0. Then, I set the selected length to 3 (3 characters), which will highlight the next 3 characters. Now, I can store, in the Map array the selected text. Then I set z (where the cursor is) to 4 characters from is current position. Which will skip the read characters, as well as the following comma. This loop will continue until it reaches the end of the line. At the end of the line, we add another 2 to z, which will account for the end line symbol.
Once these loops have finished, the Memo1 and the Map array should be perfectly synched, which will set us up for the next loops. The following for statements read all the positions in the Map array, and then draw the corresponding tile. I set up a series of if statements which do all the work for us. I store image data into a local container, and then after all the if's have run thier course, I draw the container to the corresponding location on the map. Refer to above code explanation to refresh your memory on how it works, if you need.
After displaying a Message Dialog and recieving positive feed back, the new map procedure operates by calling the TForm1.Create procedure to initailize. And then updates the array and memo1.lines through calls to the Button1.Click and Button2.Click procedures.
The CodeGen View procedure operates by showing form6, which is the codegen window.
Next in the code is the source for the Button2.Click event. The purpose of the second button, close to the second, is to load the array in a format that looks like object pascal coding. For an example, look at the CodeGen for an example of what it looks like. To accomplish this is a fairly simple task. First I got a map name, added the
':array[0..20,0..20] of integer = (('
and then read in each value from the map array, adding commas after each one. The if statments were used to see if closing brackets were needed. At the end of the x you add a single bracket, and at the end of y you add a double bracket.
The Save procedure is pretty simple if you understand the nested for loops that I have used through this program.
procedure TForm1.SaveMap1Click(Sender: TObject);
var
str : string;
dix,diy: integer;
begin
if save1.Execute then
begin
memo1.clear;
str := '';
for diy := 0 to 19 do
begin
     for dix := 0 to 19 do
     begin
     str := str+inttostr(map[dix,diy])+',';
     end;
memo1.lines.add(str);
str := '';
end;//for end
if ExtractFileExt(save1.filename) <> '.map' then
save1.filename := save1.filename+'.map';
memo1.Lines.SaveToFile(save1.filename);
end;//if save1.execute end
end;//procedure end
Once again, it updates memo1.lines and then saves it's contents to the file specified by the Save1 component, (a TOpenDialog). The if statments are used to see if the right extension was added on. If the '.map' extension exists, then save if not, add and then save.
The next line of code is even easier. It just saves the TImage (formerly a TPaintBox) to the locaton specified by Save2 (save2 has filters for .bmp while save1 has filters for .map). Remember - don't get confused. PaintBox1 is a TImage. Not a TPaintBox.
Finally, whew is the LoadMap procedure. This one loads from the specified file into the memo1.lines. Then using the parsing technique described in Button1.Click procedure, I extract the data and place it into the map array.
There is other code in the program, but it is all fairly self explanitory. It is basically calls like "Form3.Close;" "Form1.Show;" and "Memo1.Lines := Form1.Memo1.Lines". If you don't understand any of these, please e-mail me at DragonPhinn@juno.com and I will be sure to respond. Or, if you like, you can reach me through AIM with my Screen name DragnPhinn. Well thats all for now, good luck, and happy coding!
DragonPhinn